Azure Function Serverless Deployment Dotnet
![]()
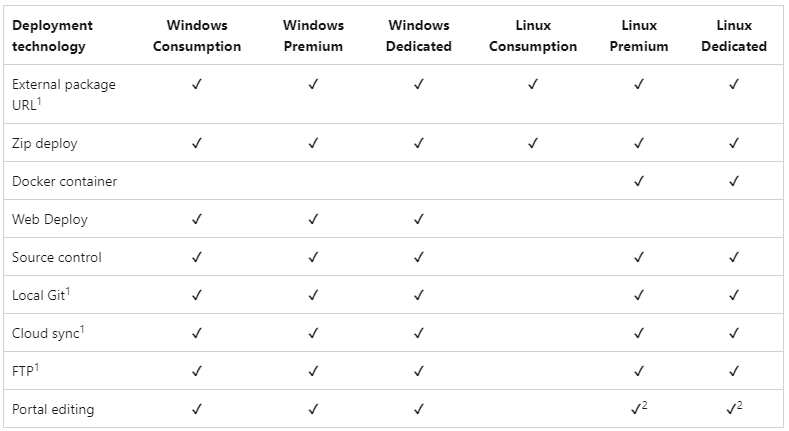
Consumption plan is the cheapest way to run your Azure Function. However, it has some limitations. For example, you can not use Web Deploy, Docker Container, Source Control, FTP, Cloud sync or Local Git. You can use External package URL or Zip deploy instead. In this article I will show you how to deploy Dotnet Isolated Azure Function App to Linux Consumption Azure Function resource using Zip Deployment.
Create azure function resource
I will use terraform to create the azure function resource. The terraform code is shown below. The code is also available on github.
# Here we define the resource group where the function will be deployed. https://registry.terraform.io/providers/hashicorp/azurerm/latest/docs/resources/resource_group
resource "azurerm_resource_group" "rg" {
  name     = "rg-func-dotnet-deployment-test"
  location = "westeurope"
}

# Here we define the storage account that will be used by the function. Any azure function needs a storage account. https://registry.terraform.io/providers/hashicorp/azurerm/latest/docs/resources/storage_account
resource "azurerm_storage_account" "st_func" {
  name                            = "stfuncdotnetdeployment"
  resource_group_name             = azurerm_resource_group.rg.name
  location                        = azurerm_resource_group.rg.location
  account_tier                    = "Standard"
  account_replication_type        = "LRS"
}

# Here we define the service plan that will be used by the function. The service plan defines the location, the operating system and the pricing tier. https://registry.terraform.io/providers/hashicorp/azurerm/latest/docs/resources/service_plan
resource "azurerm_service_plan" "func_plan" {
  name                = "plan-func-dotnet-deployment-test"
  location            = azurerm_resource_group.rg.location
  resource_group_name = azurerm_resource_group.rg.name
  os_type             = "Linux"
  sku_name            = "Y1" # Y1 is the cheapest pricing tier. 'Y' stands for Dynamic. That means Consumption Plan.
}

# Here we define the function app. The function app is the actual function that will be deployed. It is linked to the service plan and the storage account. https://registry.terraform.io/providers/hashicorp/azurerm/latest/docs/resources/linux_function_app
resource "azurerm_linux_function_app" "func" {
  name                       = "func-dotnet-deployment-test"
  location                   = azurerm_resource_group.rg.location
  resource_group_name        = azurerm_resource_group.rg.name
  service_plan_id            = azurerm_service_plan.func_plan.id
  storage_account_name       = azurerm_storage_account.st_func.name
  storage_account_access_key = azurerm_storage_account.st_func.primary_access_key
  app_settings = {
    FUNCTIONS_WORKER_RUNTIME       = "dotnet-isolated" # https://learn.microsoft.com/en-us/azure/azure-functions/dotnet-isolated-process-guide
    SCM_DO_BUILD_DURING_DEPLOYMENT = "false" # set to false to disable build during deployment. Do not set it to true. It will cause deployment to fail.
  }
  site_config {
    application_stack {
      dotnet_version              = "6.0"
      use_dotnet_isolated_runtime = true
    }
  }
}
Create azure function dotnet application
You can create azure function in a different ways. Here is the Microsoft documentation about how to do this in Visual Studio, Visual Studio Code or Command Line. In this example I will use Azure Function Isolated worker process. The function itself is not so important. I will use the default function that is created by Visual Studio Code. You can find the source code on my github. Here is the function HTTP trigger code.
[Function("Ready")]
public HttpResponseData Run([HttpTrigger(AuthorizationLevel.Anonymous, "get", "post")] HttpRequestData req)
{
    _logger.LogInformation("C# HTTP trigger function processed a request.");
    var response = req.CreateResponse(HttpStatusCode.OK);
    response.Headers.Add("Content-Type", "text/plain; charset=utf-8");
    response.WriteString("Welcome to Azure Functions!");
    return response;
}
Deployment
There are many ways you can use to deploy your azure funtion. However, for Linux Consumption Plan there are only two ways: you can use External package URL or Zip deploy.
 I will use Zip deploy option for this example.
First, you need to build the project.
dotnet build project.csproj --configuration Release --output publish
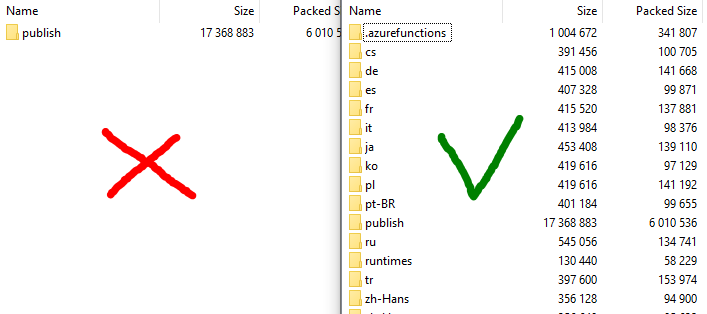
Then you need to create deployment package. You can find more information about deployment package structure here. In short, you need to create a zip file with all the files from the publish folder but not the publish folder itself!
cd publish
rm local.settings.json
zip -r ../publish.zip .
cd ..
Double check that you generate the zip file correctly. If you don’t then you can face an issue when Azure says ‘Deployment successful’ but the function app is not working.
Then you need to deploy the package to the function app. You can find credentials on Azure Portal or use Terraform Outputs.
# deploy the artifact to the function app. You can find credentials on Azure Portal or use Terraform Outputs.
DEPLOYMENT_APP='func-dotnet-deployment-test'
DEPLOYMENT_USER='$func-dotnet-deployment-test'
DEPLOYMENT_PASSWORD='***********************'
CREDENTIALS=$DEPLOYMENT_USER:$DEPLOYMENT_PASSWORD
curl -v -X POST --user $CREDENTIALS --data-binary @"publish.zip" https://$DEPLOYMENT_APP.scm.azurewebsites.net:443/api/zipdeploy
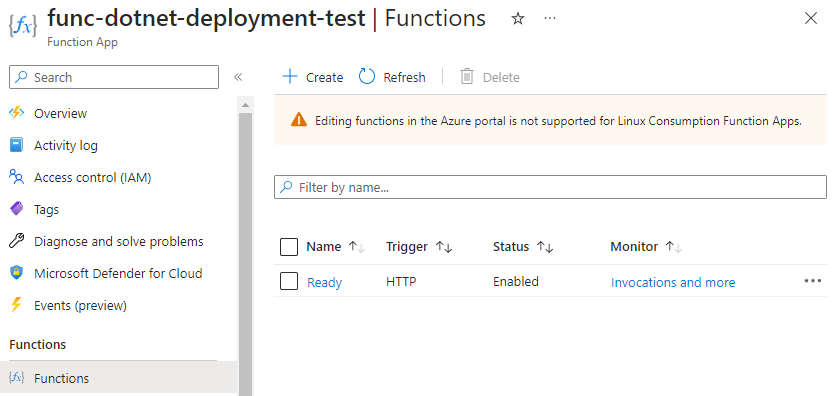
After deployment you can check the logs.
curl -X GET --user $CREDENTIALS https://$DEPLOYMENT_APP.scm.azurewebsites.net:443/deployments
After successful deployment you can check that the archive is locates in the storage account of the function app inside the ‘scm-releases’ container.

Another interesting thing is trigger syncing. But eventually the Zip deploy will perform this synchronization for you.
Conclusion
Zip Deploy can be used to deploy dotnet isolated azure function to Linux Consumption Plan. It is simple and does not require additional software installed on the CD runner or shared credentials like Azure Service Principal.