Azure API Management to Azure Storage Account

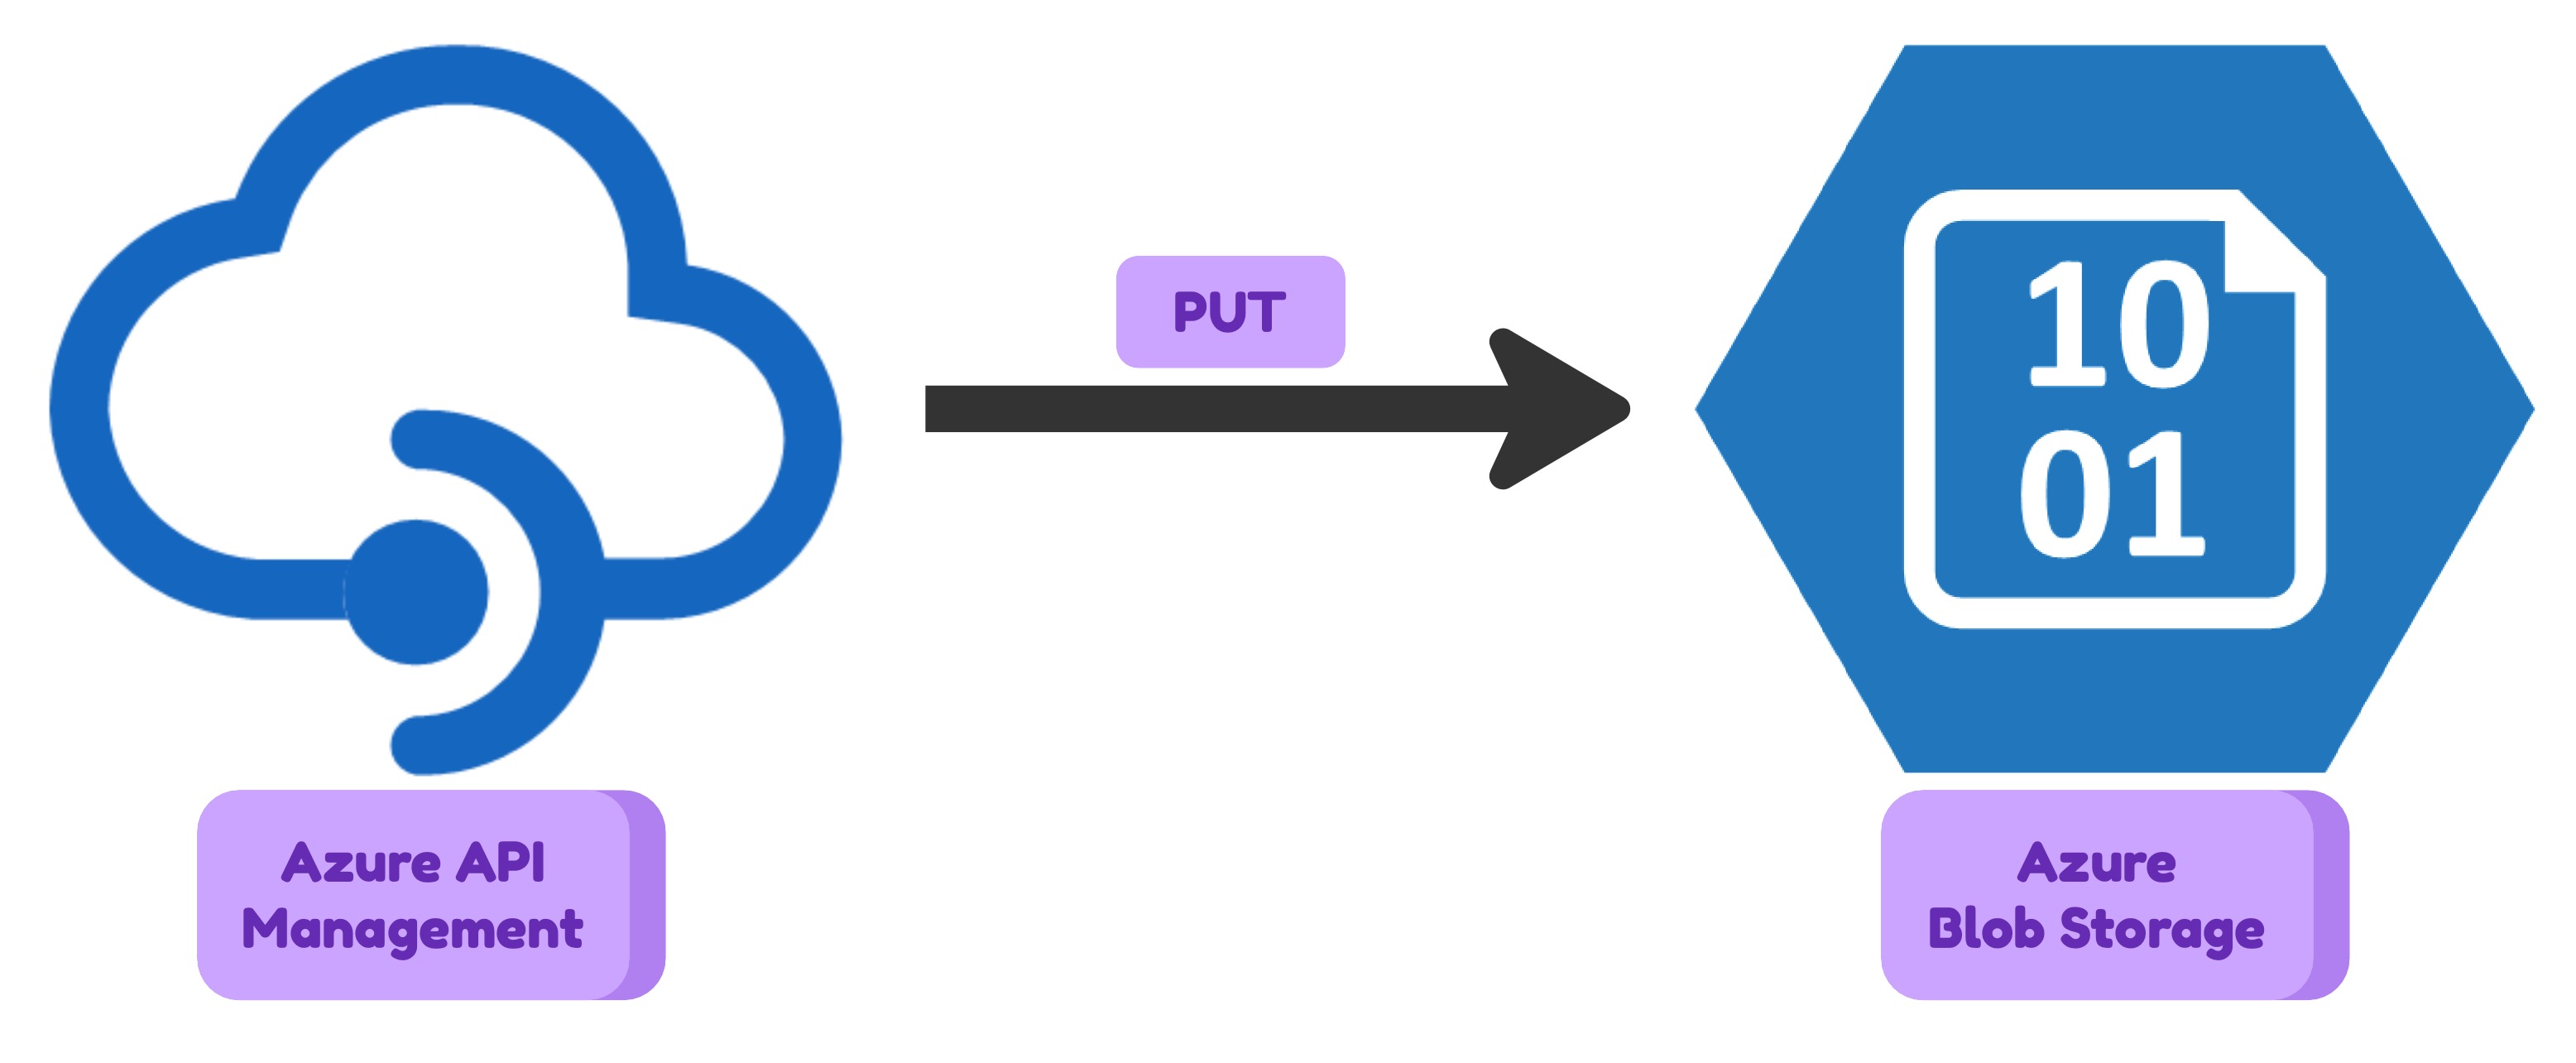
There can be the case when you need to upload a file or metadata to Azure Storage Account from an application which is outside of your cloud infrastructure. You should not expose your storage account to the internet for that purpose. There are many reasons for that: securuty, flexibility, monitoring etc. The natural solution to acheave the goal is to use something in between of your Azure Storage Account and the public internet. Some kind of HTTP proxy that will manage user authentication, do some simple validations and then pass the request to Storage Account to save the request body data as a blob. Azure API Management is a perfect candidate for that role. It is a fully managed service that means you don’t need to create any custom application. It is highly available and scalable. It has a lot of features that can be used for your needs.
In this article I will show how to configure Azure API Management to upload a file to Azure Storage Account.
I will use Terraform to describe the infrastructure. To make it more interesting I will create two brands: Adidas and Nike. Each brand will have its own storage account. The goal is to upload a file to the corresponding storage account container depending on the brand. The API consumer will pass the brand name in the request header.
Infrastructure
First, I will create two storage accounts and two containers in each of them. One storage account will be used for Adidas brand and another one for Nike brand. Each brand will have its own container. Then I will create Azure API Management instance.
# Resource group for all resources
resource "azurerm_resource_group" "rg" {
  name     = "rg-apim-to-blob"
  location = "westeurope"
}

# Storage account for Adidas brand
resource "azurerm_storage_account" "sa_adidas" {
  name                            = "stadidas6july2023"
  resource_group_name             = azurerm_resource_group.rg.name
  location                        = azurerm_resource_group.rg.location
  account_tier                    = "Standard"
  account_replication_type        = "LRS"
}

# Container for Adidas brand
resource "azurerm_storage_container" "sc_adidas" {
  name                  = "reports"
  storage_account_name  = azurerm_storage_account.sa_adidas.name
  container_access_type = "private"
}

# Storage account for Nike brand
resource "azurerm_storage_account" "sa_nike" {
  name                            = "stnike6july2023"
  resource_group_name             = azurerm_resource_group.rg.name
  location                        = azurerm_resource_group.rg.location
  account_tier                    = "Standard"
  account_replication_type        = "LRS"
}

# Container for Nike brand
resource "azurerm_storage_container" "sc_nike" {
  name                  = "reports"
  storage_account_name  = azurerm_storage_account.sa_nike.name
  container_access_type = "private"
}

# Azure API Management instance
resource "azurerm_api_management" "apim" {
  name                = "apim-brands-july-2023"
  location            = azurerm_resource_group.rg.location
  resource_group_name = azurerm_resource_group.rg.name
  publisher_name      = "My Company"
  publisher_email     = "[email protected]"
  sku_name            = "Consumption_0"
  identity {
    type = "SystemAssigned"
  }
}
Next, I will create a role assignment to allow Azure API Management to access the storage account containers.
# Allow APIM to access the 'Adidas' storage account container.
resource "azurerm_role_assignment" "sc_adidas_role_assignment" {
  scope                = azurerm_storage_container.sc_adidas.resource_manager_id
  role_definition_name = "Storage Blob Data Contributor"
  principal_id         = azurerm_api_management.apim.identity[0].principal_id
}

# Allow APIM to access the 'Nike' storage account container.
resource "azurerm_role_assignment" "sc_nike_role_assignment" {
  scope                = azurerm_storage_container.sc_nike.resource_manager_id
  role_definition_name = "Storage Blob Data Contributor"
  principal_id         = azurerm_api_management.apim.identity[0].principal_id
}
Then I will create two backends in Azure API Management. One backend will be used for Adidas brand and another one for Nike brand. Each backend will be configured to use the corresponding storage account container.
# Backend for Adidas brand
resource "azurerm_api_management_backend" "apim_backend_adidas" {
  name                = "adidas-storage"
  title               = "adidas-storage title"
  description         = "Storage account for Adidas Description"
  resource_group_name = azurerm_resource_group.rg.name
  api_management_name = azurerm_api_management.apim.name
  protocol            = "http"
  url                 = "https://${azurerm_storage_account.sa_adidas.name}.blob.core.windows.net/${azurerm_storage_container.sc_adidas.name}"
}

# Backend for Nike brand
resource "azurerm_api_management_backend" "apim_backend_nike" {
  name                = "nike-storage"
  title               = "nike-storage title"
  description         = "Storage account for Nike Description"
  resource_group_name = azurerm_resource_group.rg.name
  api_management_name = azurerm_api_management.apim.name
  protocol            = "http"
  url                 = "https://${azurerm_storage_account.sa_nike.name}.blob.core.windows.net/${azurerm_storage_container.sc_nike.name}"
}
Next, I will create a ‘Product’ in Azure API Management. This product will be used to group APIs and apply policies to them. I will also create one API in Azure API Management. This API will be used to upload a file to Azure Storage Account.
# Product definition
resource "azurerm_api_management_product" "apim_product" {
  product_id            = "my_product_id"
  api_management_name   = azurerm_api_management.apim.name
  resource_group_name   = azurerm_resource_group.rg.name
  display_name          = "My Product"
  description           = "My Product Description"
  terms                 = "My Product Terms"
  subscription_required = true
  subscriptions_limit   = 1
  approval_required     = true
  published             = true
}

# API definition
resource "azurerm_api_management_api" "apim_api" {
  name                = "example-api-name"
  resource_group_name = azurerm_resource_group.rg.name
  api_management_name = azurerm_api_management.apim.name
  revision            = "1"
  display_name        = "Integrations with Azure Managed Services"
  api_type            = "http"
  path                = "path"
  protocols           = ["https"]

  subscription_key_parameter_names {
    header = "subscription"
    query  = "subscription"
  }
}

# API to Product association
resource "azurerm_api_management_product_api" "apim_product_api" {
  api_name            = azurerm_api_management_api.apim_api.name
  product_id          = azurerm_api_management_product.apim_product.product_id
  resource_group_name = azurerm_resource_group.rg.name
  api_management_name = azurerm_api_management.apim.name
}

# API operation definition
resource "azurerm_api_management_api_operation" "apim_api_opn" {
  operation_id        = "to-blob-storage"
  api_name            = azurerm_api_management_api.apim_api.name
  api_management_name = azurerm_api_management_api.apim_api.api_management_name
  resource_group_name = azurerm_api_management_api.apim_api.resource_group_name
  display_name        = "Send data to the blob storage"
  method              = "POST"
  url_template        = "/blobstorage"
  description         = "Send data to the blob storage"
}
And here is the most important part of this example. I will create a policy that will be applied to the API operation. This policy will check the value of the ‘brand’ header and based on that value it will route the request to the corresponding backend.
The policy is the combination of inbound, backend, outbound and on-error policies. The inbound policy is executed before the request is forwarded to the backend. The backend policy is executed before the request is forwarded to the backend. The outbound policy is executed after the response is received from the backend. The on-error policy is executed when an error occurs during the request processing.
Let’s take a look at what do we need to do in Inbound policy. First, we need to check the value of the ‘brand’ header. If the value is ‘adidas’ then we will route the request to the ‘adidas-storage’ backend. If the value is ’nike’ then we will route the request to the ’nike-storage’ backend. If the value is not ‘adidas’ or ’nike’ then we will return the 400 status code with the message ‘Invalid brand’.
<choose>
  <when condition="@(context.Request.Headers.GetValueOrDefault("brand","") == "adidas")">
    <set-backend-service backend-id="${azurerm_api_management_backend.apim_backend_adidas.name}" />
  </when>
  <when condition="@(context.Request.Headers.GetValueOrDefault("brand","") == "nike")">
    <set-backend-service backend-id="${azurerm_api_management_backend.apim_backend_nike.name}" />
  </when>
  <otherwise>
    <return-response>
        <set-status code="400" reason="Bad Request" />
        <set-header name="Content-Type" exists-action="override">
        <value>application/json</value>
        </set-header>
        <set-body>@{
        var json = new JObject() {{"Error", "Invalid brand"}} ;
        return json.ToString(Newtonsoft.Json.Formatting.None);
        }</set-body>
    </return-response>
  </otherwise>
</choose>
Here I used the following policies:
- choose - allows to choose one of the branches based on the condition
- set-backend-service - allows to set the backend service that will be used to process the request
- return-response - allows to return the response to the client
Please note that some parts of this policy definition (like @(context.Request.Headers.GetValueOrDefault("brand","") == "adidas")) are policy expressions but other parts (like ${azurerm_api_management_backend.apim_backend_nike.name}) are parts of terraform configuration and evaluated to the corresponding values during terraform execution. The context object is the object that is available in the policy expressions and contains the information about the request and response. You can read more about the context object here.
Now, whe backend is set we can choose the exact path inside the container where the blob should be created.
For this example I will use the following path: /y=yyyy/m=MM/d=dd/h=HH/requestId where the requestId is the unique identifier (GUID) of the request. This will allow us to store the blobs in the following structure:
/y=2021/m=07/d=01/h=12/5ad1b359-1e24-4c1d-ad1b-35de14e8839c
<rewrite-uri
  template="@($"{DateTime.UtcNow.ToString("\\y=yyyy/\\m=MM/\\d=dd/\\h=HH")}/{context.RequestId.ToString()}")" copy-unmatched-params="false" />
Then we need to set the HTTP headers that are required by the Storage Account HTTP API:
<set-method>PUT</set-method>
<set-header name="x-ms-date" exists-action="override">
  <value>@(DateTime.UtcNow.ToString("R"))</value>
</set-header>
<set-header name="x-ms-version" exists-action="override">
  <value>2023-01-03</value>
</set-header>
<set-header name="x-ms-blob-type" exists-action="override">
  <value>BlockBlob</value>
</set-header>
<set-header name="x-ms-access-tier" exists-action="override">
  <value>Hot</value>
</set-header>
Another important thing is the authentication header. As you could see earlier I used System Assigned Managed Identity to grant access to the Storage Account. In order to authenticate the request we need to use authentication-managed-identity policy. The policy will use the System Assigned Managed Identity to get the access token and then it will add the Authorization header to the request:
<authentication-managed-identity resource="https://storage.azure.com/" />
In the outbund policy we will expect the response from the Storage Account HTTP API and we will return the OperationId in the response body:
<choose>
  <when condition="@(context.Response.StatusCode == 201)">
    <set-header name="Content-Type" exists-action="override">
      <value>application/json</value>
    </set-header>
    <set-body>@{
      var json = new JObject() {{"OperationId", context.RequestId}};
      return json.ToString(Newtonsoft.Json.Formatting.None);
    }</set-body>
  </when>
</choose>
resource "azurerm_api_management_api_operation_policy" "apim_api_operation_policy_blobstorage" {
  api_name            = azurerm_api_management_api_operation.apim_api_opn.api_name
  api_management_name = azurerm_api_management_api_operation.apim_api_opn.api_management_name
  resource_group_name = azurerm_api_management_api_operation.apim_api_opn.resource_group_name
  operation_id        = azurerm_api_management_api_operation.apim_api_opn.operation_id
  xml_content         = <<XML
<policies>
  <inbound>
    <base />
    # Our custom inbound policy
  </inbound>
  <backend>
    <base />
  </backend>
  <outbound>
    <base />
    # Our custom outbound policy
  </outbound>
  <on-error>
    <base />
  </on-error>
</policies>
XML
}
That’s it! you can find the full example here.
Testing
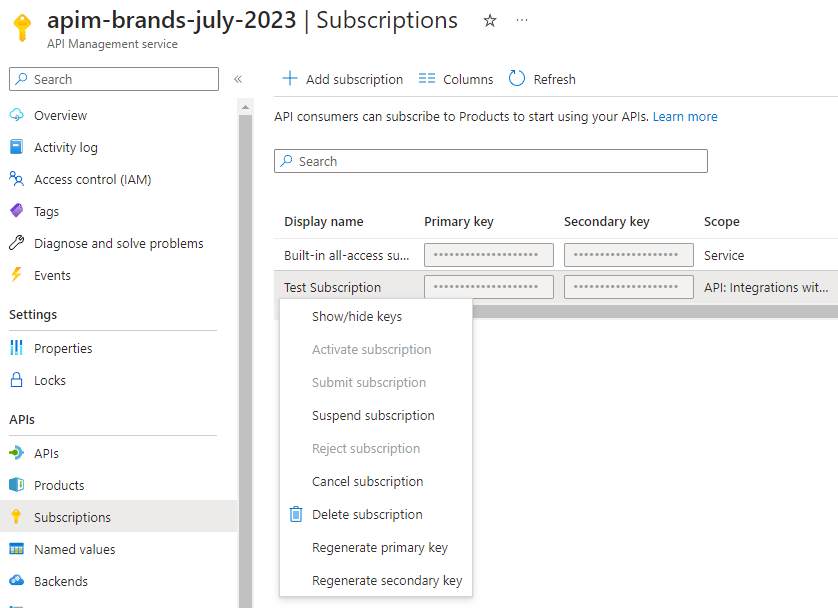
To test our API we first need to create new subscription key and get it’s value.
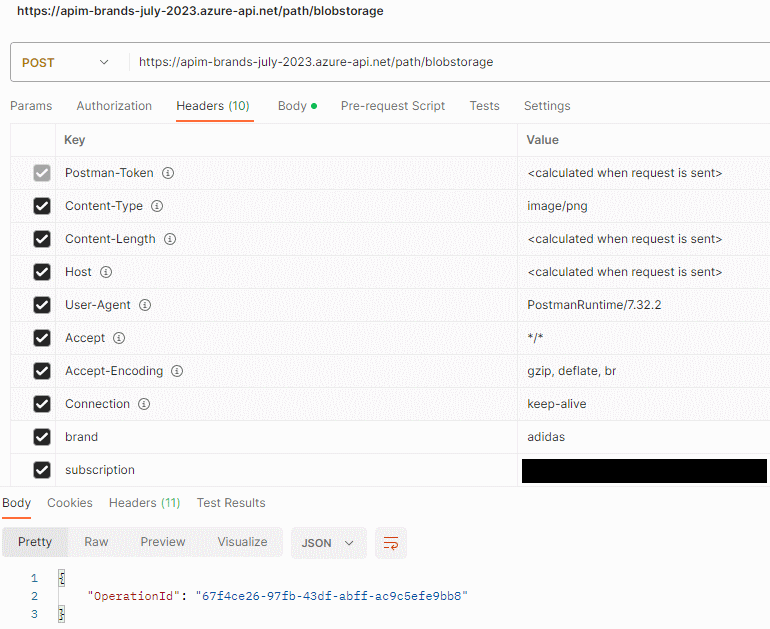
 Then we can use a tool like Postman to send a request to our API:
 And finally we can check the blob in the Azure Storage Account:

Conclusion
In this article we learned how to use Azure API Management to create an API that will store the request body in the Azure Storage Account. We also learned how to use Terraform to automate the deployment of the solution. I hope you enjoyed this article and found it useful. If you have any questions please leave a comment below.