Using MSBuild to deploy composite web application

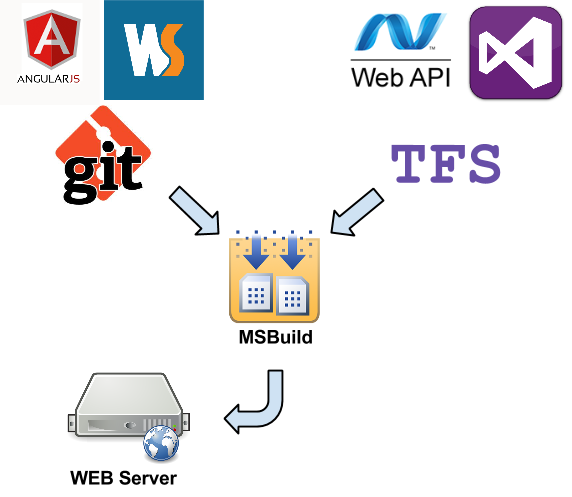
Nowadays web applications got new trend to be a “single page applications”. The difference between single page app and usual one is that while usual application has rich backend functionality that is responsible for both business logic and html generation, single page application is focused on having rich JavaScript frontend that is responsible for all user interaction things and “thin” backend that provides the data source for that JavaScript using web API and JSON. A good example of such web application is Grooveshark - great music platform that makes my working day better all the time. Another interesting trend is that we have a new software engineering area called front-end software engineering. Front end developers are using JavaScript frameworks like AngularJS, KnockoutJS and BackboneJS and usually they have their own IDE called Webstorm (by JetBrains). From my experience front-end and back end teams can have even different VCS on a project (for example GIT and TFS). As a result developers can have deployment issues because the JavaScript part of the project is not actually part of Visual Studio solution. Here is how to deploy this kind of projects using MSBuild.
MSBuild is a build engine by Microsoft that allows you to build applications without launching Visual Studio. Here is a common command-line syntax:
C:\Windows\Microsoft.NET\Framework\v4.0.30319\MSBuild.exe MvcApplication.sln
Now let’s discuss how it works. The executable file MSBuild.exe gets solution file path a single input parameter. Now we need to understand what the solution file actually is. It’s a file that contains project files’ references in XML format. Each project file (".csproj", .“vbproj”) has a completed description of state (references to another libraries, included source files, local variables) and actions (AKA “targets”) that could be made with this project. By default Microsoft Visual Studio creates project files with import references for common used target files (for example Microsoft.WebApplication.targets) that makes sense to have in your project type. What you should definitely know is that you can create your own target files that allow you do anything you need with your project using MSBuild tool.
In this article we will discuss how to do the following:
- Get front-end part of project from GIT repository
- Build it using GRUNT
- Copy compiled front-end project to .NET project folder
- Get the latest .NET project sources from TFS
- Compile .NET project
- Attach Front-end project to .NET project
- Deploy them together to hosting environment using any publish mechanism.
Let’s start with variables definition and create a new file “config.targets” with the following content:
 <Project ToolsVersion="3.5" xmlns="http://schemas.microsoft.com/developer/msbuild/2003">
   <Import Project="Logic.targets"/>
   <PropertyGroup>

     <!-- TFS VARIABLES -->
     <TFSourceLocation>$/MyProject/Main</TFSourceLocation>
     <TFSUserName>UserName</TFSUserName>
     <TFSPassword>Password</TFSPassword>

     <!-- GIT VARIABLES -->
     <GITRepo>https://github.com/lAnubisl/byalexblog.git</GITRepo>
     <GITBranch>release</GITBranch>

     <!-- LOCAL PATH VARIABLES -->
     <BackEndLocalPath>C:\\MyProject\BackEnd</BackEndLocalPath>
     <FrontEndLocalPath>C:\\MyProject\FrontEnd</FrontEndLocalPath>

     <!-- LOCAL TOOLS VARIABLES
     (FOR CASE WHEN THEY ARE NOT REGISTERED IN PATH ENVIRONMENT VARIABLE) -->
     <NPM>"C:\Program Files\nodejs\npm"</NPM>
     <GIT>"C:\Program Files (x86)\Git\bin\git.exe"</GIT>
     <TF>"C:\Program Files (x86)\Microsoft Visual Studio 12.0\Common7\IDE\tf.exe"</TF>

     <!-- VISUAL STUDIO PUBLISH PROFILE -->
     <PublishProfile>PublishProfileFileNameWithoutExtension</PublishProfile>
     <PublishUsername>PublishProfileUserName</PublishUsername>
     <PublishPassword>PublishProfilePassword</PublishPassword>

   </PropertyGroup>
 </Project>
Here are two majour parts: Import for the rest of targets and PropertyGroup node that contains all Properties definition. I Hope property names are self-descriptive and easy to follow. If so then we focus on the rest of our targets. Create new file “Logic.targets” with the following content:
<Project ToolsVersion="3.5" xmlns="http://schemas.microsoft.com/developer/msbuild/2003">
<Target Name="CloneFrontEnd" Condition="!Exists('$(FrontEndLocalPath)')">
<exec command="mkdir "$(FrontEndLocalPath)"" />
<exec command="$(GIT) clone $(GITRepo)" WorkingDirectory="$(FrontEndLocalPath)" />
<exec command="$(NPM) install -g bower" WorkingDirectory="$(FrontEndLocalPath)" />
<exec command="bower install" WorkingDirectory="$(FrontEndLocalPath)" />
<exec command="$(npm) install -g grunt-cli" WorkingDirectory="$(FrontEndLocalPath)" />
<exec command="$(npm) install -g istanbul" WorkingDirectory="$(FrontEndLocalPath)" />
<exec command="$(npm) install" WorkingDirectory="$(FrontEndLocalPath)" />
</Target>
<Target Name="BuildFrontEnd" DependsOnTargets="GetLatestFrontEnd;">
<exec command="$(GIT) fetch" WorkingDirectory="$(FrontEndLocalPath)" />
<exec command="$(GIT) checkout $(GITBranch)" WorkingDirectory="$(FrontEndLocalPath)" />
<exec command="$(GIT) pull" WorkingDirectory="$(FrontEndLocalPath)" />
<exec command="$(npm) install" WorkingDirectory="$(FrontEndLocalPath)" />
<!-- FOR MY CASE GRUNT WILL PUT THE RESULT TO \dist DIRECTORY -->
<exec command="grunt" WorkingDirectory="$(FrontEndLocalPath)" />
</Target>
<Target Name="MoveFrontEnd" DependsOnTargets="BuildFrontEnd;">
<CreateItem Include="$(FrontEndLocalPath)\dist\**\*">
<Output TaskParameter="Include" ItemName="MoveFrontEndSource" />
</CreateItem>
<!-- /portal/ IS THE DIRECTORY WHERE WEB USER EXPECTS TO FIND Angular WEB APPLICATION -->
<Copy SourceFiles="@(MoveFrontEndSource)"
DestinationFolder="$(BackEndLocalPath)/Web/portal/%(RecursiveDir)">
</Copy>
</Target>
<Target Name="PublishBackEnd" DependsOnTargets="MoveFrontEnd;">
<exec command="$(TF) get $(TFSourceLocation) /recursive /version:T /noprompt"
WorkingDirectory="$(BackEndLocalPath)" />
<MSBuild Projects="$(BoardTraqLocalPath)/Web/WebApplication.sln" Properties="
VisualStudioVersion=12.0;
DeployOnBuild=true;
Configuration=Debug;
PublishProfile=$(PublishProfile);
AllowUntrustedCertificate=true;
Username=$(PublishUsername);
password=$(PublishPassword)">
</MSBuild>
</Target>
</Project>
Ok. Now BuildFrontEnd target will compile and put Front End application to /dist directory, MoveFrontEnd target will take all files from /dist and copy them into our Back End application sources directory /Web/portal and PublishBackEnd task will publish our Back End application to a web server. Looks great but one more little thing needs to be done.
The /Web/portal directory and all nested files are not part of Visual Studio project and we need to dynamically attach them to the project for a short period of time when we publish Visual Studio solution.
What we need is to create WebApplication.wpp.targets file with the following content:
<?xml version="1.0" encoding="utf-8"?>
 <Project ToolsVersion="4.0" xmlns="http://schemas.microsoft.com/developer/msbuild/2003">
   <Target Name="DeployFrontEnd"
           BeforeTargets="CopyAllFilesToSingleFolderForPackage;CopyAllFilesToSingleFolderForMsdeploy">
     <ItemGroup>
       <FrontEndFiles Include="portal\**\*" />
       <FilesForPackagingFromProject Include="%(FrontEndFiles.Identity)">
         <DestinationRelativePath>portal\%(RecursiveDir)%(Filename)%(Extension)</DestinationRelativePath>
       </FilesForPackagingFromProject>
     </ItemGroup>
   </Target>
 </Project>
Now let’s launch MSBuild:
C:\Windows\Microsoft.NET\Framework\v4.0.30319\MSBuild.exe Config.targets /t:PublishBackEnd
@PAUSE
The /t: paremeter specifies the name of the target in Config.targets (remember Config.targets imports Logic.targets)
That’s it! Enjoy!