Breaking Through Barriers: Simplifying CD with Automated Azure SQL Schema Changes!
![]()
Have you ever tried to deploy a Microsoft SQL database schema to Azure SQL using a linux-based CI/CD pipeline? If you did, you probably know that it is not a trivial task. The reason is that the Microsoft.Data.Tools.Msbuild package is not available for linux. The package contains MSBuild targets and properties that are used to build and deploy database projects. The package is a part of SQL Server Data Tools (SSDT) and it is not available for linux. So if you want to deploy a database schema to Azure SQL using a linux-based CI/CD pipeline you need to use a different approach.
In this article we will see how to deploy a Microsoft SQL database schema to Azure SQL using any linux-based CI/CD pipeline (Gitlab, GitHub, Azure DevOps, etc).
DISCLAIMER: At the moment of writing the Microsoft.Build.Sql is in preview and the documentation is not complete. So use the information in this article at your own risk.
Prerequisites
You need to have the following tools installed:
- dotnet sdk (At the monemt of writing the DacFx tool requires dotnet 6.0, not the latest version)
- sqlpackage (DacFx)
- az cli
Database schema definition
We are going to use Database Project to define any aspect of our database schema. The project is a set of SQL scripts that are executed in a specific order to create a database schema. The project can be created in Visual Studio, using SQL Server Data Tools or in Visual Studio Code using DacFx.
In this article we will use Visual Studio Code and DacFx. The reason is that we want to use a linux-based CI/CD pipeline and Visual Studio is not available on linux. Visual Studio Code is available on linux and DacFx is a cross-platform tool.
Create a database project
# install the project template
dotnet new -i Microsoft.Build.Sql.Templates

# create a new database project
dotnet new sqlproj -n ProductsTutorial
As a result there will be a new directory ProductsTutorial with the following files:
ProductsTutorial
└── ProductsTutorial.sqlproj
The ProductsTutorial.sqlproj is a project file that describes the database project. It is a regular MSBuild project file with some additional properties and targets.
<?xml version="1.0" encoding="utf-8"?>
<Project DefaultTargets="Build">
  <Sdk Name="Microsoft.Build.Sql" Version="0.1.10-preview" />
  <PropertyGroup>
    <Name>ProductsTutorial2</Name>
    <DSP>Microsoft.Data.Tools.Schema.Sql.Sql160DatabaseSchemaProvider</DSP>
    <ModelCollation>1033, CI</ModelCollation>
  </PropertyGroup>
</Project>
The Microsoft.Build.Sql SDK is a set of MSBuild targets and properties that are used to build and deploy database projects. The DSP property defines the version of the SQL Server Data Tools (SSDT) schema provider. The ModelCollation property defines the default collation for the database.
Add a new file dbo.Product.sql alongside the project file.
CREATE TABLE dbo.Product (
    Id INT NOT NULL IDENTITY(1,1) PRIMARY KEY,
    Name NVARCHAR(100) NOT NULL,
    Price DECIMAL(18,2) NOT NULL
);
Configure the project for Azure SQL
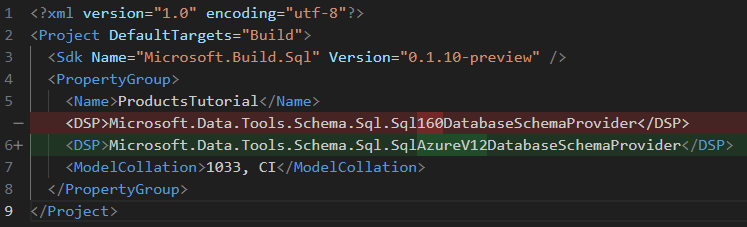
Before we build the project we need to make sure that the target database version is set correctly. The default version is SQL Server 2019. We are going to use Azure SQL, so we need to change the target version in sqlproj file (Set DSP to ‘Microsoft.Data.Tools.Schema.Sql.SqlAzureV12DatabaseSchemaProvider’).
Build and deploy the project
I will use simple bash script to build and deploy the project. The script is self-explanatory. The only thing that is worth mentioning is that we need to obtain an access token for Azure SQL. The token is used to authenticate the deployment. The token is obtained using az cli and then passed to sqlpackage tool.
I will use an example of the Azure Service Principal authentication (As the most commonly used for CI/CD piplines AFAIK). But it is also possible to use Azure Federation Authentication, for local use you can just do az login. Or you can use Sql Server Authentication, but I do not recommend that.
# build step
dotnet build ProductsTutorial/ProductsTutorial.sqlproj

# deploy step
# 1. sign in to azure using azure cli.
# $ARM_CLIENT_ID is the application id of the service principal
# $ARM_CLIENT_SECRET is the secret of the service principal
# $ARM_TENANT_ID is the tenatn id of the azure subscription
az login --service-principal -u $ARM_CLIENT_ID -p $ARM_CLIENT_SECRET --tenant $ARM_TENANT_ID

# 2. deploy the database project to azure sql
# obtain the access token for azure sql
token=$(az account get-access-token --resource=https://database.windows.net/ --query accessToken --output tsv)
# deploy the database project to azure sql
sqlpackage \
    /Action:Publish \
    /SourceFile:"ProductsTutorial/bin/Debug/ProductsTutorial.dacpac" \
    /AccessToken:$token \
    /TargetConnectionString:"Server=[YOUR_SERVER_NAME].database.windows.net; Encrypt=True; Database=[YOUR_DATABASE_NAME];"
The output should look like this:
Publishing to database 'sqldb-database-project-deployment' on server 'sql-database-project-deployment.database.windows.net'.
Initializing deployment (Start)
Initializing deployment (Complete)
Analyzing deployment plan (Start)
Analyzing deployment plan (Complete)
Updating database (Start)
'QUERY_STORE=OFF' is not supported in this version of SQL Server.
Creating SqlTable [dbo].[Product]...
Update complete.
Updating database (Complete)
Successfully published database.
Changes to connection setting default values were incorporated in a recent release.  More information is available at https://aka.ms/dacfx-connection
Time elapsed 0:01:58.04
After the deployment is complete, you can check the database in the Azure Portal. The database should contain the dbo.Product table.
You can find the repository with the source code for this article here.
Additional resources
- Repository: Tutorial
- Repository: GitHub Action
- Article: Microsoft.Build.Sql: the next frontier of SQL projects
- NuGet package: Microsoft.Build.Sql
- VsCode extension: SQL Database Projects